Using Navigations and the Hierarchy Browser

Using Navigations and the Hierarchy Browser

Without navigations, the web would be unthinkable. Scrivito enables you to work efficiently with them.

With Scrivito, maintaining a navigation comes down to creating or pasting pages directly where they are meant to appear: in the navigation itself. To get an understanding of how this works, we’re going to show you how the Example App’s top navigation supports you with structuring a Scrivito website. Since most Scrivito-based websites are derived from the Example App, there’s a good chance that your website’s navigation looks similar and works in the same way.

After switching to editing mode, take a look at the top navigation to see what it can do for you.

The navigation is indicated by a blue handle at its top right corner. When hovering over it, a frame with blue borders enclosing the navigation items appears. The handle is in fact a button that opens a menu, when clicked. Using this menu’s commands, you can add, paste or move pages to the navigation, or sort its items.

Note that creating a page via the main menu’s “Create page” command does not add it to any navigation. It simply creates a stand-alone page, whereas the navigation’s “Add page” command makes the new page a sibling of the existing ones.

Let’s try this out: click “Add page” and select the “Page” type. This causes an “Untitled” page to be appended to the existing navigation items. You could now move the new page within the navigation by selecting “Sort items” from its menu.

The page hierarchy and its children

To get an idea of how these blue bordered automatic navigations work, think of a single-parent family tree and call it page hierarchy. Every page created or managed using such navigations automatically becomes a direct or indirect descendant of the origin page and can have any number of sibling or child pages. The origin page is called “root” in Scrivito, and since pages are (CMS) objects, the root actually is the root object, which most often represents the website’s homepage.

Now, if you take another look at the above navigation, picture its items as children of the root page. Scrivito allows developers to insert such automatic child list navigations anywhere on the website, and, in this case, the parent used is the root page.

LEARN HOW THE PAGE HIERARCHY ENABLES NAVIGATIONS

Child list navigations are based on the path that every page part of the hierarchy has. Pages not part of the hierarchy are stand-alone simply because they don’t have a path. Don’t worry, you can safely ignore paths as Scrivito maintains them for you as well, so just for completeness: The path of a page looks something like “/about/contact”, indicating in this case that the root page, “/”, has a child named “about”, which is the parent of ”contact”. The path of a page can be looked up on the “System” tab in the page properties. Automatically assigned path component names look like “34e9e47614cf1145”.

Nested navigations

The Example App’s top navigation is able to handle submenus, which is exemplified by its “About” and “Widgets & pages” items. The respective arrow next to these two items indicates that child items exist; just hover over one of the two to make the corresponding submenu appear. Analogously to the top navigation, the secondary navigation has a blue frame and a menu for adding pages, etc.

Moving and copying pages

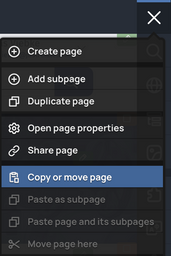
Just open the page you wish to move, select “Copy or move page” from Scrivito’s main menu, and then “Move page here” from the navigation’s menu. This way, i.e. by combining page-related commands from the main menu with commands from a navigation, you can move or copy pages within the same navigation or across different ones, turn them into subpages, etc.

Inspecting and browsing the page hierarchy

As we’ve already touched on the page hierarchy above, let’s jump straight in and take a closer look at Scrivito’s hierarchy browser. It provides you with an overview of your website’s structure and lets you conveniently click through the pages to inspect or adjust them individually.

Automatic child list navigations work on a subsection of the page hierarchy. To see what this means with respect to the Example App’s top navigation, first select “Our clients” from the “About” submenu, then open the hierarchy browser (using the the corresponding button near the top of the sidebar).

In the hierarchy browser, the “Our clients” page is selected (and thus highlighted) and surrounded by the other items in the “About” submenu. The topmost item in the hierarchy is the root page of which, in our case, “Product”, “About”, etc., are child pages, just like in the top navigation. Using the arrow toggles on the left hand side, you can expand or fold in pages with subpages.

Selecting a page from the hierarchy panel navigates to that page and highlights the panel item, so that it is always clear which page you are inspecting. The panel’s contents is preserved while editing the page being viewed, so selecting several pages one by one is easy.

Every item on the hierarchy panel includes a menu button on the right-hand side that becomes visible when hovering over the item. When clicked, the menu pops up underneath the item. It lets you add a subpage, open the page properties, delete the page, copy it, and more.

[New in 1.24.0]You can also remove a page from the hierarchy (and thus from all automatic navigations) in case you want it to be a stand-alone page, e.g. a landing page. Note that the page must not have subpages for this option to be available. To move a stand-alone page back into the hierarchy, select “Copy or move page” from the main menu, and then “Move page here” from the menu of the navigation to which the page should be added.

The menu and its actions are available independently of whether a page has been selected or not, giving you a means to manage pages without losing focus of the selected page.

Last, but not least, click the ⓘ button at the top of the panel to hide (or display) details such as the page type or the date of the most recent change.