The JustRelate Portal App can serve as a basis for implementing many and varied websites, not just customer portals. In this guide, we are going to show you how to remove the default content and start from scratch with just a homepage. On this occasion, we’re also going to explain how to use the layout areas.
Using the Portal App as the Foundation of a New Website
Using the Portal App as the Foundation of a New Website
For this tutorial, you don’t need to download or clone the Portal App and execute it locally because we won’t touch any files in the codebase. Just open your Portal App in the browser.
Let’s get started right away!
Adding a site
In the Web Builder, a website is represented by its homepage object. Typically, a content object of the “Homepage” type is equipped with several attributes from which the app code obtains various global styling and layout settings, site-specific access keys for third-party services like Facebook, etc.
First, when opening your Portal App in the browser, make sure to have “scrivito/” in the URL path as the first element after the hostname for having the editing interface available. Of course, you can also use the editing interface on edit.scrivito.com, or jump in via the JustRelate Console.
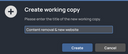
Then, create a working copy for applying the changes we’re going to make in the course of this guide. You can do this by setting the display mode to “Edit” using the switch on the top bar, or by clicking “New” in the “Working copies” sidebar.

Next, on the “Sites” sidebar, click “Add site” and provide the name, homepage type, and the language of the site you wish to create.
Afterwards, if you select the new site via the “Sites” sidebar, an almost empty page with a top navigation, a logo area, a headline and a text widget will be displayed. We will take care of the layout of this page later.
Removing the default websites
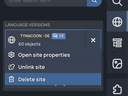
Now that you have created your new site, you can easily remove the default websites that come with the Portal App. For this, every site in the “Sites” sidebar has a context menu (three dots) with a “Delete site” item.
Simply click “Delete site” for each of the default sites you want to remove. This will delete the entire sites including all their pages and content.
After that, some global images and other assets from the default sites may still be present in your content. If you wish to completely clean up your workspace, open the Content Browser, select the unwanted items that belonged to the deleted sites (you can select several at once), and delete them.
Specifying the new site’s basic properties
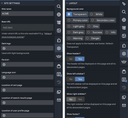
If you open the properties of the homepage you created a few moments ago, you will notice that there’s a whole bunch of configuration options available on several tabs, too many to discuss all of them here.
The options most essential for the site to work properly are the “Base URL” and “Location of search results page” site settings (the latter only if you want to enable searching), and the header, sidebars, and footer layout options.
Base URL: This is the URL of your site’s homepage, e.g., https://acme.com.
Location of search results page: In the context of the Portal App, the search results page is a regular page that is equipped with a few special widgets providing the functionality needed to display clickable search results, “search again” and “load more” buttons, etc. You can copy this page from one of the original portal sites (via another working copy), paste it to your new site, and specify it here in the site settings.
Header, sidebars, and footer: These layout elements are disabled by default. Switching them on as needed allows you to globally add standard elements such as a top-level navigation, breadcrumbs, etc., to your pages via widgets. To edit these layout sections, switch to “Edit layout” in the top bar.
Populating the navigation
The first thing that should be done after creating a new website is to specify its title on the “General” tab in the page properties. Later, this title shows up in, for example, the “Breadcrumbs” widget, making it easier to navigate back to the homepage from any subpage. Then, choose the other layout areas you wish to include on your pages.
As an example, we’ve enabled the “Left navigation” layout option, placed a “Vertical navigation” widget inside the corresponding widget list, and switched “Show link to parent page” on in this widget’s properties.

Now, to create a subpage underneath the homepage, click the light blue handle of the “Left navigation” widget, followed by “Add page”. You will be presented with a dialog that lets you select the type of the new page. Wherever such a light blue handle can be seen, it’s for managing the subpages of the current page.
Several other layout options and widgets are available to bring the new site to life, e.g., the “Breadcrumbs” widget mentioned above.
Summarized ...
After adding a new site to the Portal App content, and removing the default sites, you can use the page and widget types the app provides to add your own content and choose how it’s made accessible to visitors, most probably via a navigation.
For getting the most out of the Portal App, we recommend installing it locally and adapting the existing page and widget types according to your demands, or to create custom page types or custom widget types to cover your individual use cases.