With JustRelate Web Builder, creating interfaces that nicely present internal or external data of any kind, be it personal data in a portal, or product data in an online shop, has long been exclusively in the hands of app developers. This has changed when Web Builder SDK APIs were released for working with such data directly in the editing interface. Providing the foundation for this is of course still left to developers, but has become a lot easier.
Letting Editors Create Web Interfaces Utilizing Data
Letting Editors Create Web Interfaces Utilizing Data
This guide, which is based on the Portal App, wants to give you an insight into the clockwork behind accessing and presenting internal or external data. The datalocator attribute type on one side, and data classes on the other, form the basis on which data can be embedded from any kind of source a browser-based app can process. We will develop a universal “DataListWidget” for a Web-Builder-based app here and connect it to a small handmade internal employee database via a data class to illustrate and convey how the cogs mesh together. As the icing on top, we will then add an employee details page for displaying the data of individual employees.
We’ll jump right in, assuming that you’re familiar with The Web Builder’s data model, and ideally even have developed a widget already.
The “datalocator” attribute type
The datalocator attribute type enables editors to add data from internal or external sources as content to web pages.
If a page or a widget has an attribute of the datalocator type, The Web Builder’s editing interface allows editors to select an object class or a data class as the data source to be used by this attribute. Furthermore, filters based on the properties of the source can be specified, as well as the ordering and maximum size of the result set. The widget is then rendered based on this result set.
Creating the DataListWidget
In the Portal App, every page already has a datalocator attribute that editors can use to specify the data context of a page. For this reason, most data widgets included in the Portal App, e.g., the “DataWidget”, don’t require such an attribute. However, to make the connection between this attribute, a data class, and its use easier to understand, we will give our “DataListWidget” class its own datalocator attribute:
Next to the data attribute, the widget instances will have a widgetlist attribute named content. We will use it to render the employee data coming in from the datalocator. For the widget to properly advertise itself, e.g., in the widget selection dialog or sidebar, give it a title (and maybe also a description) via an editing configuration:
To render instances of the “DataListWidget” class, its component first uses the useData hook to create a DataScope from the data attribute, yielding an array of DataItems. This array is then iterated to output as many Scrivito.ContentTag components for the content widget list as the data scope contains items:
The magic here lies in the dataContext prop receiving an individual DataItem, including all its attributes, each time Scrivito.ContentTag is rendered. If an editor now adds a content widget, e.g. a text widget, to any of the content widgetlists, the data context of the respective DataItem with its attributes serves as the source of the attribute values that can then be rendered as placeholders, for example.
Making external data available through a data class
To exemplify how internal or external data can be made available to your Web-Builder-based web application so that editors can build webpages displaying it, we will use an app-internal “database”, a JSON array containing a few employee records. In a real-life use case, you would of course fetch such data via the API endpoints your data source offers.
Adding the data class and editing configuration definitions
For working with data, a data class including a callback at least for retrieving the data is required. Depending on the use case, also callbacks for creating, updating, and deleting individual pieces of this data can be defined.
Now, let’s elaborate on and define our Employee data class. Its purpose is to facilitate access to the employee data, and pass it to the app via the datalocator attribute of the “DataListWidget” instances. In other words, a data class serves the Web Builder SDK as an interface to the data source. Whenever a component of your app makes use of a datalocator attribute, the SDK relies on the callback routines implemented in the corresponding data class to fetch (get), list (index), create, update, or delete the pieces of data concerned.
Our Employee data class implements only get and index for retrieving individual records, and, respectively, for listing and filtering the employee data as a whole. The file also accommodates the employee “database”:
The above call to Scrivito.provideDataClass yields our Employee data class. Its get callback returns the record referenced by the id passed in.
The index callback first filters the database records by the criteria specified for the datalocator attribute. Usually, you would accomplish this by sending a corresponding request to your remote service. Finally, the index callback returns an object with an array containing the IDs of the records that are left after filtering.
Providing placeholders
To enable editors to insert the values of the properties contained in the database records into the page content, we’re going to provide the relevant properties as placeholders by creating an editing configuration for the Employee data class:
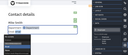
An editor who wants to have an employee’s name, email address or department displayed in a “DataListWidget” instance can now mark a piece of text, select “Variable” from the toolbar that appears, and then pick any of the three variable names.

Let’s try it out!
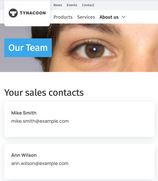
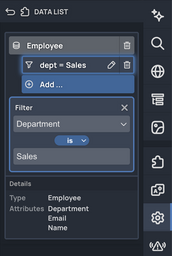
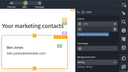
To test our new “DataListWidget” in combination with the employee database, we’ve added a page to the app, and placed two of these widgets on it, inside a column widget. The first one filters the dept property for “Sales” as shown on the screenshot above, the second one for “Marketing”. Both contain a “CardWidget” with a text widget in which placeholders are used for the employee data.

Voilà!
Adding an employee details page
In connection with a data list, a details page serves to display or edit some or all of the properties of an individual list item. Offering such a page is useful or even necessary if the items have more properties than you want to be displayed in the list. This definitely doesn’t apply to our employee data with only three properties, but for the sake of completeness, we’ll do it anyway.
Basically, a details page can be regarded and set up as a regular page equipped with a datalocator attribute named data. The Web Builder identifies a details page only by this combination of the data attribute name and datalocator type, found in the object class concerned. If this is the case for a page instance, the Web Builder’s editing interface automatically adds a “Data” tab to the page properties. There, editors can specify the data class of the items the details page is about, and link to it where needed.
In the Portal App, standard pages are based on the “Page” object class, and already have a datalocator attribute named data. And, as we’ve used a “Card” widget on the list page to accommodate some of the items’ properties, creating a details page and linking to it is easy because “Card” widgets feature an attribute of the Link type. In this widget’s properties, an editor can simply click “Create a link to the details page”. This allows them to select the “Page” type, causing the details page – in this case for our “Employees” – to be created automatically. The attributes of the data class are then available as variables, allowing you to add an item’s details to this page as needed. Note that any content widget with a Link attribute suits this purpose, not just the “Card” widget.
Once a details page has been created for a data class, you can link to this page from wherever a property of an item of this class is displayed. For example, instead of letting a card widget point to the employee details page, you could link the employee’s name to it.
Final notes
A DataScope like the one we used in our widget component above has a create method for creating DataItems. To update or delete a DataItem, its update and delete methods are available. Using these methods requires the DataClass to be equipped with the corresponding callbacks, of course. For editors, the Portal App includes data form and button widgets to create, update, and delete data items.
If you want to make data globally accessible as a DataItem, Scrivito.provideDataItem lets you do this.